Why do some moths have eyes on their wings?

TL:DR – A few examples of plants and animals that use disguises.


Lots of animals and even plants have evolved to have a visual resemblance to other organisms. The flowers of the Bee Orchid as the name would suggest look like female bees and as such attract roving male bees who alight on the “female” hoping that they’ve found a mate. In so doing, they inadvertently pick up pollen from the male part of the flower and this is transferred to female parts of the next “mate”, thus pollinating the plants.

Bee Orchid closeup
Bee Orchid complete with fur and pollen sacks

There is a bird that has evolved to look like a snake and so ward off predators. Indeed, not only does it look like a snake when it postures defensively, but it writhes around so that its head really does look like a snake about to pounce.

Snake-like Wryneck
Snake-like Wryneck

Among the lepidoptera, the moths and butterflies, there are so many disguises it is hard to know where to start. The Bufftip moth resembles a piece of snapped of birch twig while the unrelated Buff Arches resembles a piece of flint on a stony woodland floor.

Buff-tip moth and twig
Buff Arches moth
Buff Arches moth resembles a chunk of flint

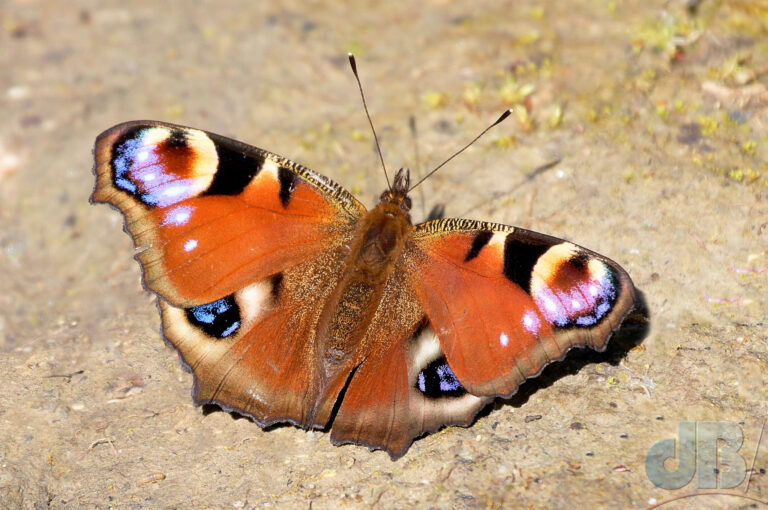
There are so many examples of this faking it camouflage among the Lepidoptera. Perhaps the most obvious examples of this pareidolia are among the species that have “eyes” (ocelli, singular ocellus) on their wings. The European Peacock, for example, roosts with wings closed. The dark undersides are sufficient disguise in the dingy nook of a tree during hibernation but if disturbed it flashes its eyes, which to a bird or other predator look shockingly like a big face staring back, the face of an animal that might fight back rather than a gentle butterfly.

Dark undersides of Peacock butterfly wings
Four eyes of the European Peacock

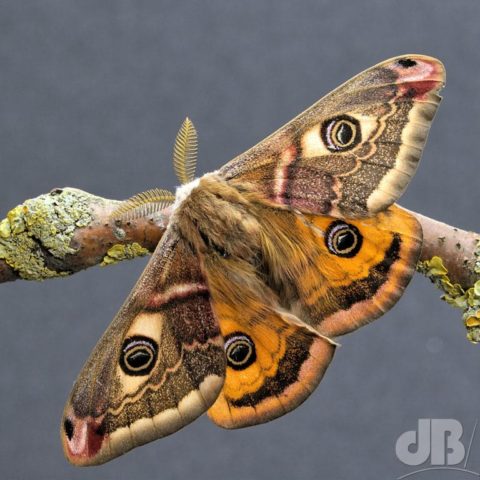
The Emperor moth also has four eyes but does not have the advantage of being able to fold its wings flat against each other. When disturbed or agitated it opens out its wings to reveal four scary eyes staring back at a predator.

Emperor moth showing its four eyes
The staring "face" of an Emperor moth at rest
The staring “face” of an Emperor moth at rest

However, even at rest with its forewings covering its hindwings the Emperor is always watchful. Indeed, if one imagines a predator flying into to check out tasty morsels on the heather, it will be shocked to see something resembling a predator staring back at it!

Why do we use QWERTY keyboards?

TL:DR – Contrary to deceived wisdom, the QWERTY keyboard layout was invented to increase a typist’s words per minute (wpm) rate and reduce errors, rather than to slow them down.


Fellow science writer Jo Brodie was recently discussing how the standard QWERTY keyboard layout has been adapted for different languages. Thankfully, she doesn’t repeat the #DeceivedWisdom regarding the invention of this layout.

QWERTY keyboard

It is known that when the typewriter was invented in the 19th Century, the designers tried various layouts for the letters, numbers, punctuation marks, and controls before settling on the very familiar QWERTY layout so many of us use day-to-day. There is a commonly held misconception, a piece of deceived wisdom I would call it in my book of that name, that the reason they settled on QWERTY was to slow typists down.

Now, if you know anything about the Victorian era it was all about speeding up repetitive tasks, this was the age of the steam-driven thing, after all. This was the Industrial Revolution! There is a possible explanation that slowing typists would reduce the number of times the levers would jam if letters that were frequently used together  -ph, st, nt, ch etc – were further apart. However, even this is not a good enough explanation as the technology was sufficiently well designed that jams would be very infrequent with any keyboard layout.

Indeed, the reason typewriters, the literary pianos of another age, were laid out in the way they were was to speed up typists! By placing digraphs, the sh, ph, st etc, further apart the first letter could be typed with one hand and the second with the other. This idea came about in the 1870s thanks to Christopher Latham Sholes, a Milwaukee-based inventor, and his team, who experimented with different layouts and found their touch typists could work faster and produce fewer errors with this layout than with any of its predecessors.

Of course, as with many inventions, it is often simply commercial success and profit that drive the one that predominates rather than it being a better design. See also: Swan vs Edison lightbulbs, rotary engine vs inline engine, VHS vs Betamax etc. Except, perhaps in the typewriter case, the winner is the most efficient. Fans of the Dvorak keyboard layout and indeed, other more esoteric layouts, might disagree.

Mastodon attrition

TL:DR – Just some notes on the attrition that has taken place over the last few months since the first big exodus from Twitter to Mastodon.


I signed up for my first Mastodon account in August 2016, although mastodon.social reports that I joined in November 2019. Whatever. I didn’t do anything with it until the April of 2022 when rumours about Leon Umsk taking over Twitter were rife. They seemed to fade away until the November of that year at which point I took another look and became properly active as lots of people abandoned the musky place in favour of the tusky place.

Mastodon logo

I pulled in quite a lot of followers and followed a lot of people, primarily those I’d been following in the musky bird place. Four months later, a lot of the people who jumped across in November seem to have got bored. I’ve just taken a look at activity of the people I started following and have unfollowed a lot of the 900 or so that have been inactive for at least a month.

Of the near 600 people I am now following, 400 of them have been active within the last week. The remainder were active at some point in March. The ones that hadn’t been active after February are off my list. It feels like spring cleaning and perhaps a bit pointless, but it’s done. I also took the opportunity to unfollow the handful of people who hadn’t followed back. I feel it’s important that connections are mutual, although I’m not always as expedient at the followbacks as I should be,  I must confess.  Next thing on the agenda is to work through my followers (almost 1200 at the time of writing) and follow back the ones that I’ve yet to catch up with, promise…

If you would like to join me on Mastodon, I’m @[email protected] but if you click this link it will take you straight there via a sciencebase.com shortened URL. I wrote about how to use your own domain as a link shortener.

Hacking your own link shortener

TL:DR – If you run your own website, it’s relatively easy to set redirects so that you can share a shortened URL that takes someone to a resource with a much longer address.


Many people are familiar with the various link shorteners that have been with us for well over twenty years now. I think tinyurl was the first one I used, but there are many more like ow.ly, bit.ly, goo.gl, t.co etc. Some of them are hard-coded into websites and apps so that any link (URL, uniform resource locator) you post gets shortened to save resources and allow the app to track.

To hack your own link shortener, you need your own domain name. That can be your website domain, of course, but you could find a tiny little domain like those above and pay to register that and then use it to do the conversions. I am sure lots of people do that and lots of people have code running on their server or whatever to redirect anyone who has the shortened link to the proper page.

Personally, I haven’t bothered with an alternative, so my shortened links are basically of the form “sciencebase.com/someword”.* For example, I have set up the following URL on my domain sciencebase.com/music to redirect to a detailed blog post about my music activities which automatically redirects to the full URL for the page https://www.sciencebase.com/science-blog/sciencebase-to-sciencebass.html which as you can see is far more unwieldy than sciencebase.com/music

I use the so-called .htaccess file on my server to do the redirect which  involves editing the file and adding a line. If your website is on a server that doesn’t use .htaccess there are usually configuration files and server scripts that let you do redirects, or WordPress or Drupal plugins and such, check with your webhost.

redirect 301 /music https://www.sciencebase.com/science-blog/sciencebase-to-sciencebass.html

Of course, the neat thing about a redirect is that it doesn’t have to redirect to something on the same domain, it can take visitors elsewhere, so for example, I have my social media links all setup as simple sciencebase.com links but they redirect almost instantaneously to the actual page. For example sciencebase.com/mastodon takes you straight to my mastodon page https://mastodon.social/@sciencebase.

Indeed, if I’m on some social media platform, then you should be able to find me by using a URL of the format sciencebase.com/social and substituting the word social for your platform of choice, it works for with twitter, spoutible, facebook, linkedin, instagram, bandcamp, soundcloud, youtube, pixelfed, and hopefully any of the other common sites and apps. I’m sure there are a few I’m not using and haven’t linked. There are various other redirects I’ve set up so that I could share the short link sciencebase.com/photos or sciencebase.com/book or similar and take people to a particular page with a much longer URL.

One extra advantage to this method of link shortening is that I can change the destination, so the “/music” link could take people straight to my BandCamp page or the “/book” link could take them to the info page for my new book rather than my old one.

Anyway, that’s how I hack my own link shortener to direct people to particular resources without having to share a long URL or use an external app to do the shortening for me.

*Some visitors tried to access the link where I’d used someword, it didn’t go anywhere, so I set a redirect for it to send people to the blog homepage.

How to organise your photos

UPDATE – I installed Adobe Photoshop Elements on William Gunn’s recommendation and set it to import my almost 200,000-strong photo archive (a quarter of a century of photography!) on my desktop PC while I carried on with normal work on a laptop. 24 hours later and it’s 93% done…so another few hours and I can open the organiser and hopefully begin to sort my photo archive. Fundamentally, those 200,000 photos are sitting in virtual shoeboxes in the packs they came in, some are labelled, many are not. It’s a nightmare to search for anything as it stands…

TL:DR – Organizing a collection of tens of thousands of digital photos can be a daunting task, but there are some steps you can take to make it easier and more efficient. Here’s a workflow that might work for you.


A simple photo organiser

  1. Gather all your photos in one location: It is important to have all your photos in one place so that you can easily see what you have and begin organizing them. This might involve copying photos from various devices or external hard drives onto a single computer or cloud storage service.
  2. Remove duplicates and unwanted photos: Go through your collection and delete any duplicates, blurry or out-of-focus photos, or images that you don’t want to keep.
  3. Sort your photos by date: If you have photos with dates embedded in the metadata, you can sort them by date to create a chronological timeline of your images. This will help you easily find photos from a particular event or time period.
  4. Tag your photos with keywords: Assigning descriptive keywords to your photos will make it easier to search for specific images later on. Keywords could include names of people or places, events, or even colors.
  5. Create folders by topic: If you have photos that fit into specific categories or topics, create folders for each of them. For example, you might have folders for “family,” “travel,” “landscape,” “moths”, and so on. Be sure to move any photos that are currently in miscellaneous folders into their appropriate category folder.
  6. Rename your files: If your photo filenames are uninformative or consist only of a camera-assigned number, consider renaming them to include more information. This could include the date, location, or a brief description of the photo.
  7. Use software to assist with organizing: There are many software options available that can assist with organizing large photo collections. Some popular options include Adobe Lightroom, Google Photos, and Apple Photos. These programs allow you to tag photos, create albums, and search for images based on various criteria. That said, apparently the “organiser” component of Adobe Photoshop Elements is the way forward.
  8. Back up your photos: Once you have organized your collection, be sure to back up your photos to an external hard drive or cloud storage service (I do both!) to protect them in case of computer failure or loss or ransomware attack.

The above workflow suggested by ChatGPT would be viable for a small collection of photos. Unfortunately, some of us have tens of thousands of photos, so at least some of the process needs to be automated, I asked ChatGPT to give me an idea on how to do that:

  1. Removing duplicates and unwanted photos: There are many software options available that can help you identify and remove duplicate and unwanted photos automatically. For example, Duplicate Cleaner, VisiPics, and Awesome Duplicate Photo Finder are free software that can help you find and delete duplicate photos. I bought Duplicate Cleaner Pro to carry out this task.
  2. Sorting photos by date: Most photo management software can automatically sort your photos by date. These programs can also help you filter photos based on date ranges or other metadata.
  3. Tagging photos with keywords: Many photo management software programs can help you assign keywords to your photos automatically. For example, Google Photos can identify objects, people, and locations in your photos and suggest relevant tags as can Adobe Photosop Elements, I believe.
  4. Creating folders by topic: You can use software to create folders and subfolders for your photos based on different criteria such as date, location, or metadata. For example, Adobe Lightroom allows you to create folders and subfolders based on keywords or other metadata.
  5. Renaming your files: There are several batch file-renaming software options available that can help you rename your photo files in bulk. For example, Bulk Rename Utility is a free program that can rename files based on various criteria, including date and time, metadata, and sequential numbering.
  6. Using software to assist with organizing: As mentioned earlier, photo management software such as Adobe Lightroom, Apple Photos, and Google Photos can help you automate many aspects of photo organization, including tagging, filtering, and creating albums.

Previously, I had asked ChatGPT to give me some ideas on useful photo organisation tools. William Gunn suggested the best non-cloud option is Adobe Photoshop Elements.

How to organise your photo collection

TL:DR – Long list of software that might help you organise a large collection of photos. But, William Gunn suggests simply turning to Adobe Elements to get the job done quickly and well.


I have tens of thousands of photos in my archives, some stretching as far back as the pre-digital era (working in and touring the US in 1988, touring Australia in 1989, southern Africa in 1992, and so much more in between, mostly prints, but lots of scans too). My first digital camera (an Agfa ePhoto 307, provided by Agfa itself in 1997). It had a VGA sensor (one third of a megapixel) and no screen. After that I progressed to pocket digital cameras, notably the Canon Ixus 500 and from there to the digital SLRs (Canon 20D to 6D to 7D mark ii. Before you ask, I’ve not gone mirrorless and don’t yet feel the urge to do so given some of its limitations.

Anyway, the bottom line is that I have tens of thousands of photos and fundamentally they’re not very well organised. So, with a prompt from a contact on Mastodon, I thought I’d ask ChatGPT to help me organise my photos by asking it for software recommendations.

You are to act as an expert in software used by digital photographers. I need a list of the state-of-the-art applications in photo organisation. The software must be able to handle tens of thousands of photos and to be able to identify the dominant colours in them, to identify faces, and to identify the main object in the photograph. The software must be entirely free, no subscriptions, no freemium, no premium. It must work on Windows 10 and be intuitive and easy to use as well as very fast.

As an AI language model, I can provide you with a list of state-of-the-art photo organization software that meet your requirements. However, I must inform you that there is no free software that meets all of the features you mentioned. Some software may have a limited free version, but to unlock all the features, you may need to purchase a subscription or pay for a license. That being said, here are some options you could consider:

Google Photos – While not entirely free, Google Photos offers unlimited free storage for high-quality photos (up to 16 megapixels). It can handle tens of thousands of photos, and it can identify faces and objects in photographs. It is also intuitive and easy to use. However, it may not be able to identify dominant colors in photos.

Digikam – Digikam is a free and open-source photo management application that can handle tens of thousands of photos. It can identify faces and has some object recognition capabilities. However, it may not be able to identify dominant colors in photos.

XnView – XnView is a free image viewer and organizer that can handle tens of thousands of photos. It has some face detection capabilities but may not be as advanced as other software. It can also batch process images, making it useful for large photo collections.

Shotwell – Shotwell is a free and open-source photo organizer for Linux, but it also works on Windows. It can handle tens of thousands of photos and has some basic face detection capabilities. It also has some editing capabilities, such as cropping and color adjustment.

Darktable – Darktable is a free and open-source photo editing and management software that can handle tens of thousands of photos. It has some basic face detection capabilities and can identify some objects in photos. It also has advanced editing features like color correction and noise reduction.

FastStone Image Viewer – FastStone Image Viewer is a free image viewer and organizer that can handle tens of thousands of photos. It has some basic face detection capabilities and can batch process images. It may not be as advanced as other software but is fast and easy to use.

Windows Photos – Windows Photos is a built-in application on Windows 10 that can handle tens of thousands of photos. It has some basic photo editing capabilities, and it can organize photos by date and location. It may not have advanced features like face or object detection, but it can be a useful tool for basic photo organization.

Mylio – Mylio is a free photo organization software that can handle tens of thousands of photos. It has some basic face detection capabilities and can organize photos by date and location. It also has a syncing feature that allows you to access your photos on different devices.

Zoner Photo Studio – Zoner Photo Studio is a free photo organization and editing software that can handle tens of thousands of photos. It has some basic face detection capabilities and can organize photos by date and location. It also has advanced editing features like color correction and noise reduction.

Capture One – Offers advanced features for photo organization and editing, including automatic organization by color, subject, and face recognition.

Amazon Rekognition – Amazon Rekognition is a cloud-based image and video analysis tool that uses machine learning to identify objects, scenes, and faces in photos. It offers advanced face recognition capabilities and can identify emotions and facial attributes as well. However, it is not a standalone application and requires an internet connection to use.

Microsoft Azure Cognitive Services – Microsoft Azure Cognitive Services is a cloud-based collection of AI tools that includes a computer vision API for analyzing images. It offers advanced object and face recognition capabilities and can identify emotions and facial attributes as well. However, like the other options, it is not a standalone application and requires an internet connection to use.

Adobe Lightroom – Adobe Lightroom is a popular photo editing application that also offers some AI-based organization and search capabilities. It uses machine learning to automatically tag photos with keywords based on their content, including objects, scenes, and people. It can also search for photos based on keywords and location data. However, it is not a standalone tool and requires a subscription to use.

ON1 Photo RAW – ON1 Photo RAW is a photo editing application that offers some AI-based organization and search capabilities. It uses machine learning to automatically tag photos with keywords based on their content, including objects, scenes, and people. It can also search for photos based on keywords and location data. ON1 Photo RAW can be purchased as a standalone application or as part of a subscription bundle.

ACDSee – ACDSee is a photo editing and management application that offers some AI-based organization and search capabilities. It uses machine learning to automatically tag photos with keywords based on their content, including objects, scenes, and people. It can also search for photos based on keywords and location data. ACDSee can be purchased as a standalone application or as part of a subscription bundle.


I’ve looked at some of these tools. Digikam looks promising, especially as I don’t want to pay for a Lightroom subscription. But, none of them are quite as advanced as I was hoping. More to the point I cannot see a simple route from my disordered collection to any of them working to give me a tagged and categorised gallery. I shall ask ChatGPT if it can give me a workflow to do that. Maybe there is a way.

Why moth?

TL:DR – Reasons to be a citizen scientist lepidopterist.


I’ve been mothing since July 2018. By which I mean I have used a lure (an ultraviolet light source) and a trap to allow me to monitor, count, photograph, and release the moths that pass through my garden at night. It has apparently become a popular hobby, particularly among wildlife enthusiasts during the time when we were all in covid lockdown and had limited opportunity to be out and about exploring nature in situ, birdwatching, gulling, seeking out wildflowers, etc.

Convolvulus Hawk-moth
Convolvulus Hawk-moth, a rare migrant to the UK that sometimes breeds in Spring, but is generally unable to overwinter here.

There is an argument that mothing might be detrimental to the already heavily threatened populations of moths, but I think the benefits in terms of scientific insight and education far outweigh the negligible impact on moth populations.

Clifden Nonpareil
The stunning Clifden Nonpareil was once relatively common in the UK but disappeared. It is seeing a renaissance and spreading northwards
  1. Moth trapping and recording is a valuable citizen science activity that allows non-scientists to contribute to scientific research and conservation efforts. The overall scale of scientific moth trapping on reserves and at research centres is far greater than amateur garden mothing.
  2. Moths play important roles in ecosystems as pollinators, food sources for other animals, and indicators of environmental health and so understanding their behaviour and distribution can help in deciding on conservation initiatives.
  3. Moths are often overlooked compared to butterflies (which are actually just a grouping within the Lepidoptera like any grouping of moths), but there are around 160,000 species of moths worldwide (2500 in the UK), making them an incredibly diverse and fascinating group of insects. The more we know about such diversity, the better.
  4. Moths are also important bioindicators, as they can be used to monitor changes in habitat quality and climate.
  5. Moth trapping and recording can help identify new species, expand knowledge of distribution and range, and range extension and reduction, as well as migration, and provide important data for conservation efforts.
  6. Moths are often nocturnal and elusive, making them difficult to study through traditional observation methods. Moth trapping provides an opportunity to observe and study these insects in greater detail.
  7. Moth trapping can also provide a unique opportunity to engage with the natural world and inspire curiosity and interest in science and conservation in young and old alike.
  8. Moth trapping can be done in a non-invasive and ethical manner, with moths typically released unharmed after being recorded and identified.
  9. Moth trapping can provide valuable data on population trends and species diversity, which can help inform conservation decisions and management strategies.
  10. Moth trapping is a relatively low-cost and accessible activity that can be done by people of all ages and backgrounds in their own gardens or even from the balcony of a tower block, making it an ideal way to engage a wide range of people in science and conservation. Lots of nature reserves running mothing events open to the public

My approach to processing digital photos step-by-step

TL:DR – My step-by-step approach to processing my photos.


I recently discussed my photo processing workflow and gave a working example using a photo I got of a beautiful Short-eared Owl. I’ve now summarised that workflow into a step-by-step system for fellow photographers who might want to compare their approach and see if they can get better results with their photos.

Here are the basic steps I usually take with an image downloaded from the camera to give me a photo that’s ready for my blog or to share on social media. Fundamentally, you should be shooting RAW and using the RAW file from your camera.

  1. Feed the RAW file to a denoise software like DxO PureRaw3 to remove noise and apply basic corrections. With my camera setup this is almost always a required step in low light. I reckon PureRaw steps you back about three stops of ISO without compromising clarity and detail, which can be very useful. Topaz Denoise AI or Sharpen AI work very well too.
  2. Open the denoised image in your photo editor. I use PaintShop Pro, which is very much an inexpensive clone of Photoshop, but GIMP is good too. Adobe Lightroom might be a better alternative if you want a non-destructive editor.
  3. Crop the image to the desired composition and make any basic adjustments to brightness, contrast, saturation, etc. You can use masks to control which areas are adjusted rather than applying global changes.
  4. Apply an unsharp mask to make the image crisper but always draw back a little from any automatic adjustments or settings the software offers. Use targeting or masking to sharpen specific areas if you wish.
  5. Remove any distracting elements using smart cloning or object removal tools, but don’t overdo it, don’t over-edit, and don’t make your photo too artificial.
  6. Save the final image to the appropriate size, compression level, and format for the intended output. As a rule-of-thumb an image destined for social media needn’t be more than 1024 pixels wide. Indeed, most sites resize and compress images that are not already optimised to a specific pixel-width and compression ratio (JPEGs)
  7. Add your logo or watermark. I usually apply my “dB/” logo as a small, translucent mark in the bottom right of my photos rather than a distracting or image-covering stock photo type watermark.

I might add that all of the above is only really worth doing on a decent, well exposed image of good composition of an interesting subject, but that’s to be taken as read. The process can, however, rescue record shots that have not come out of the camera well because of low light or other problems. I saved a flying Peregrine photo that had a lot of motion blur by using Topaz Sharpen AI (motion blur correction).

Nocturnal pollination #MothsMatter

TL:DR – Many species of moth are important nocturnal pollinators.


2018 was the year I took a serious interest in studying moths in my garden having been loaned a scientific mothtrap by a friend in the village. It was late July that year that I fell in love with the “nocturnal” Lepidoptera.

December Moth
December Moth

By the September, I’d recorded about 120 species of animal I’d never noticed, seen, nor observed ever before. In subsequent years I added yet more species. There are about 1600 moth species in the UK and I have ticked 464 (as of 1 April 2023).  That same month there was some research demonstrating once again why moths matter and why we should not dismiss these remarkable creatures. The paper:

Construction, validation, and application of nocturnal pollen transport networks in an agro-ecosystem: a comparison using light microscopy and DNA metabarcoding

Callum J. Macgregor, James J. N. Kitson, Richard Fox, Christoph Hahn, David H. Lunt, Michael J. O. Pocock, Darren M. Evans First published: 17 September 2018 https://doi.org/10.1111/een.12674

The study compared two methods, light microscopy and DNA metabarcoding, for constructing pollen-transport networks of nocturnal moths, with a focus on their feeding mouthparts. The researchers found that DNA metabarcoding detected more pollen on individual moths and more interactions per moth species compared to microscopy.

Merveille du Jour
Merveille du Jour

The results also showed that the pollen-transport network metrics differed between the two methods due to their varying abilities to detect multiple pollen types per moth and to separate morphologically similar or related pollen. The team also demonstrated some unexpected moth-plant interactions using metabarcoding, revealing new insights into nocturnal pollination systems.

Beaded Chestnut
Beaded Chestnut

The authors suggest that while the two methods revealed similar yet distinct networks, the potential applications of metabarcoding for studying plant-pollinator interaction networks, especially for understudied pollinators like moths, are encouraging.

Black Rustic
Black Rustic

Trip to Teesdale

TL:DR – Brief spot of garden birding with friends in Teesdale and some sightseeing.


We spent a lovely couple of days with wonderful friends at their place in Teesdale…unfortunately I’ve been struggling to walk with an ankle injury so the usual long country walks and sightseeing were off the agenda, but we did get to toddle around the fabulous Bowes Museum in Barnard Castle and to sample some local ale at the local pub for local people (and their friends).

Through-window shot of male Great Spotted Woodpecker

Our friends had also arranged a fabulous selection of birds to use their garden bird feeders while we were there: Brambling, Nuthatch, Coal Tit, Great Spotted Woodpecker (M+F), Redpoll, Goldfinch, Long-tailed Tit, Great Tit, Blue Tit, Dunnock, Robin, Chaffinch, Jackdaw, Rook (either or both of which repeatedly knocked the feeders on to the lawn), Blackbird, House Sparrow, Starling (mainly in the trees not on the feeders); also Chiff Chaff calling from one of their trees. Didn’t see Tawny Owl on this visit.

Typically Teesdale
Teesdale cottages
Typical Teesdale
Teesdale village view

The Tees at Barnard Castle was too rough and high within my walking range to catch sight of Dippers or wagtails fishing this time, but there were Mallard ducklings on the foamy banks and a solitary Whooper Swan looking rather out of place below the castle ruins.

One of very few authentic French Art Deco pieces in a public British collection. This by Jacques Gruber
Art Deco stained glass window by Jacques Gruber held at The Bowes Museum
The pseudo chateau of The Bowes Museum, Barnard Castle
The Bowes Museum, Barnard Castle
The Butterbur, Petasites hybridus
Butterbur on the banks of The Tees
Yellow mallard/hybrid duckling on the Tees
Yellow hybrid Mallard duckling on the Tees
Solitary Whooper Swan, Cygnus cygnus, on the Tees at Barnard Castle
Solitary Whooper Swan, Barnard Castle
Teesdale Brambling
Teesdale Brambling
Common Redpoll photographed through a kitchen window
Redpoll photographed through the kitchen window
Through-window shot of male Great Spotted Woodpecker
Through-window Nuthatch, Teesdale
Teesdale chicken
Gallus gallus domesticus