UPDATE: March 2023 – I am currently using DxO PureRaw instead of the full PhotoLab. It does the same with denoising and lens/camera corrections. I then adjust curves and levels with PaintShopPro as I had been doing prior to trying PhotoLab.
UPDATE: January 2023 – I wrote this article back in 2018, since then various programs have come on to the market that offer AI approaches to denoising photographs many of which are much easier to use and work really well. For example, the Topaz AI Denoise tool reduces noise and blur and can even reduce motion blur, as I demonstrated in an article with a photograph of a Peregrine Falcon flying overhead. DxO Photolab is my current denoise software of choice though, its DeepPrime system effectively lowers the ISO of any noisy photograph by the equivalent of about three stops (like shooting at 400 rather than 3200 but with the same shutter speed and aperture). It lens/camera corrections built-in too as well as allowing you to adjust levels, curves, saturation etc etc.
Noise can be nice…look at that lovely grain in those classic monochrome prints, for instance. But, noise can be nasty, those purple speckles in that low-light holiday snap in that flashy bar with the expensive cocktails, for example. If only there were a way to get rid of the noise without losing any of the detail in the photo.
Now, I remember noise in spectroscopy at university, you could reduce it by cutting out any signal that was below a threshold. Unfortunately, as with photos that filtering cuts out detail and clarity. So, a solution was to run multiple spectra of the same sample, like taking the same photo, you could then stack them together so that the parts that are of interest add together. You then apply the filter to cull the dim parts, the noise. The bits that are the same in each shot (or spectrum will be added together, but the random noise will generally not overlap and so will not get stronger with the adding. The low-level filtering then applied will remove the noise and not cut the image. No more ambiguous spectral lines and no more purple speckles. That is in theory, at least. Your mileage in the laboratory or with your photos may vary.
De-noising by stacking together repeat frames of the same shot comes into its own when doing astrophotography where light levels are intrinsically low. Stack together a dozen photos of the Milky Way say, the stars and nebulae add together, then you can apply a cut to anything that isn’t as bright as the dimmest and you can reduce the noise significantly. Stack together a few hundred and your chances are even better, although you will have to use a system to move the camera as time goes on to avoid star trails.
Then it’s down to the software to work its tricks. One such tool called ImageMagick has been around for years and has a potentially daunting command-line interface for Windows, Mac, and Unix machines, but with its “evaluate-sequence” function it can nevertheless quickly process a whole stack of photos and reduce the noise in the output shot.
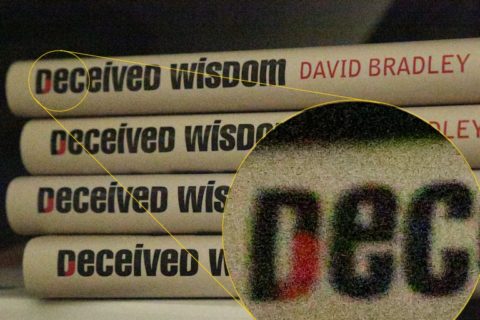
As a quick test, given it’s the middle of the afternoon here, I went to my office cupboard which is fairly dark even at midday, and searched out some dusty copies of an old book by the name of Deceived Wisdom, you may have heard of it. I piled up a few copies and with my camera on a tripod and the ISO turned as high as it will go to cut through the gloom, I snapped half a dozen close-ups of the spines of the books. The first photo shows one of the untouched photos, with a zoom in on a particularly noisy bit.

Next I downloaded the snaps, which all look essentially identical, but each having a slightly different random spray of noise. I then ran the following command in ImageMagick (there are other apps that will be more straightforward to work with having a GUI rather than relying on a command prompt. Nevertheless, within a minute or so the software has worked its magic(k).
magick convert *.jpg -evaluate-sequence median book-stack.jpg
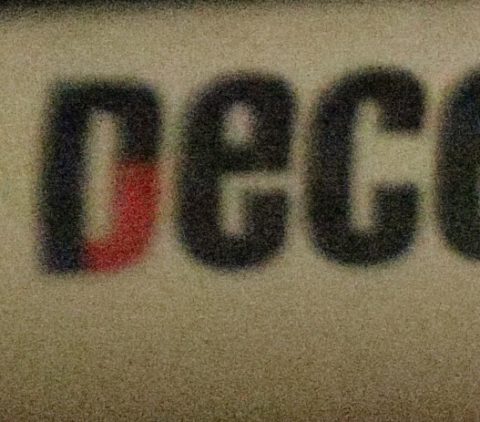
And, so here’s the result, well the zoomed in area of the composite output photo, the average of the six essentially identical original frames with the noise filtered to a degree from the combined image. There is far less random colour fringing around the letters and overall it’s crisper. The next step would be to apply unsharp masking etc to work it up to a useful image.

It’s not perfect, but there is far less noise than in any of the originals as you can hopefully see. The software you use can have fine adjustments, but perhaps the most important factor is taking more photos of the same thing. That’s probably not going to work at that holiday cocktail bar, but with patience should work nicely for astro shots. Of course, if I wanted a decent noise-free photo of my book, I could have taken them out of the cupboard piled them on my desk, lit them properly, used a flash and diffuser and what have you and got a really nice photo with a single frame. But, then what would you learn from me doing that other than that I still have copies of my old book?