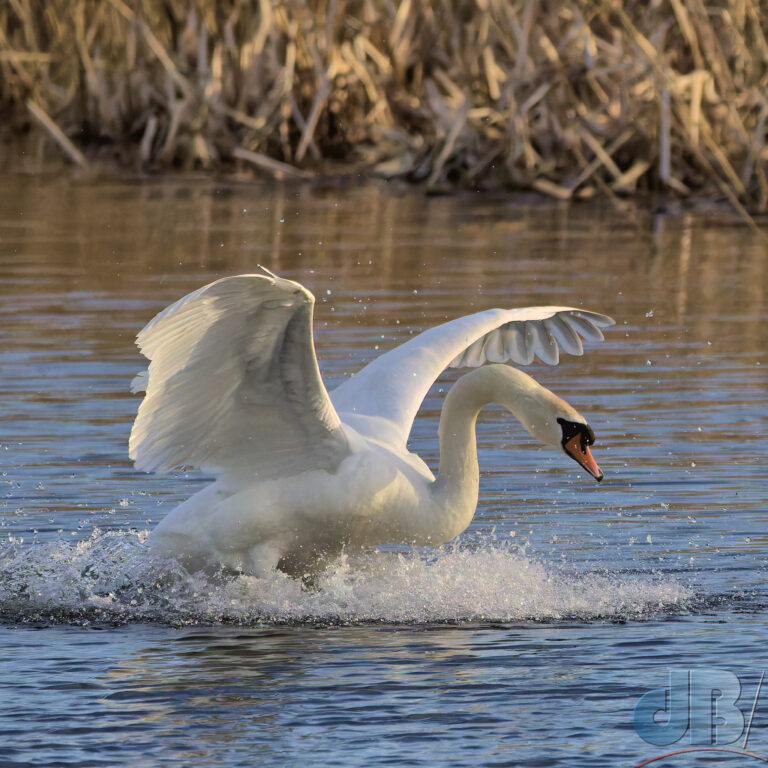
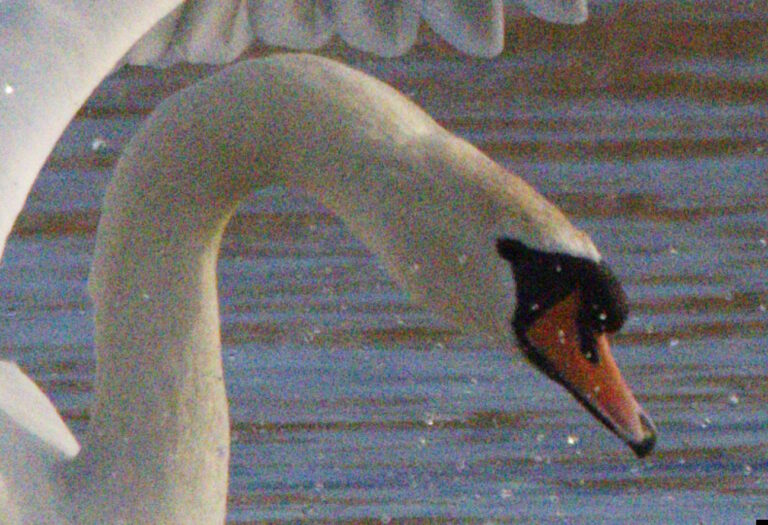
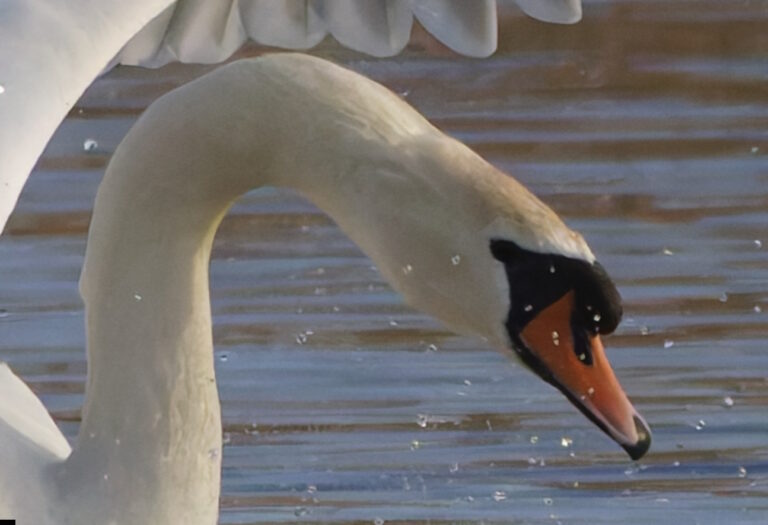
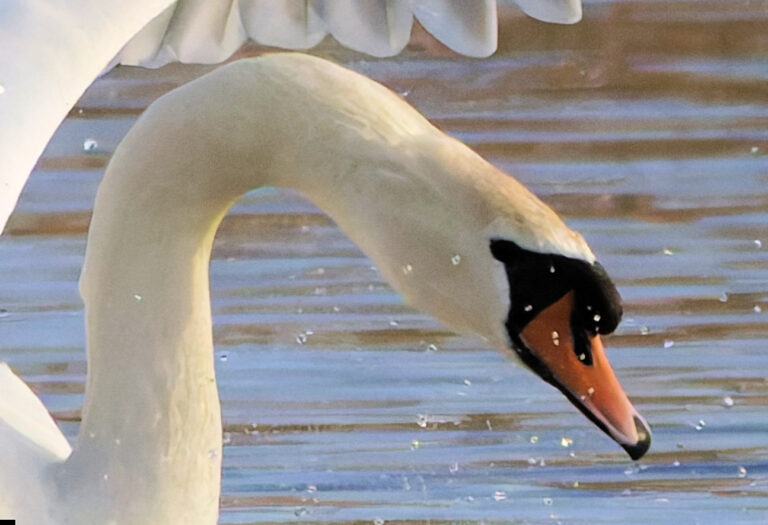
Back in February, DxO sent me a beta version of their PureRaw4 software to test drive ahead of the official launch in March. So, having used version 3 for years, I was keen to incorporate the upgrade into my workflow. I’ve pushed it to the limit with a high-speed, low-light photo of a Mute Swan landing on a lake. This is the final result, below you can read how I got there from a very noisy RAW file straight out of the camera.

The bottom line is that PureRaw4 does an excellent job of basically knocking out noise to the equivalent of about three whole stops of ISO, fixing various aberrations inherent in one’s camera-lens combinations, and also applying a degree of subtle sharpening. I wrote a short summary around the time of their official launch when they emerged from beta testing.

My photography has various focal points – birds (flying and perched) snapped with a Sigma 150-600 on a Canon R7 and macro photos of moths, with a 90mm Tamron 1:1 lens, and commonly focus stacked. The focus-stacked output from the camera is JPEG, so inaccessible to PureRaw4 which requires a RAW file. But, the bird photos and landscapes, events, and architectural photography is always shot in RAW. So, a perfect fit for PureRaw4.

The biggest problem with the big lens is hand-holding, and I rarely take a tripod for various reasons. Anyway, when the light’s fading, and I’m keeping shutter speed short to freeze the avian action, the camera will ramp up lens sensitivity, the ISO, and that makes for more photographic noise. My Canon 7Dii was the worst, I never got on with that. I do wish I’d had PureRaw back then, it would’ve been a lifesaver. But, the R7 its mirrorless successor, is not particularly over-noisy, thank goodness. However, there is always room for improvement. And PureRaw4 does wonders for my twilight owl shots, for instance.

Anyway, in terms of workflow, as I’ve mentioned you must be shooting in RAW. You will get the most from your photography if you take control in that way. RAW gives you all the information that the sensor captures in your shot. RAW is your digital negative.
So, my first step, having selected an appropriate shot I’d like to use from my downloaded photoshoot, is to open the RAW file. You might prefer to open multiple files or to import and process semi-automatically, but I prefer to work with one photo at a time. You let the software download the requisite files for your camera-lens combination. And, then choose your settings. I go for the high-end algorithm (DeepPrime XD2) and allow the software to do the default lens softness, vignetting and other fixes. PureRaw4 runs faster than its predecessor in tests.
Often my photos are at 600mm zoom on a 2/3 frame camera, with a shutter speed of less than 1/2000s, f/6.3 aperture almost by default and then whatever ISO the camera chooses. If it’s dusk or dull, that ISO number will inevitably be way too high and there will be noise. As per the Mute Swan photos example. I’d used a very short shutter speed, 1/16000s, which mean the ISO was at 6400 as the aperture is f/6.3 at this zoom. It’s like dropping three whole stops to ISO 800.
PureRaw4’s algorithm strips away the speckles without stripping away the detail. Its sharpening seems to do something rather subtle that enhances the photo, to my eye. It is worth pointing out that any digital manipulation leads to a technical loss of information, but our eyes don’t see information, they see details and patterns, light and shade, and an enhancement that may technically discard pixels will in the case of this kind of processing lead to a better image
PureRaw4 removes a lot of the noise from any photograph really well. The basic “camera-lens” corrections for your setup are very useful too and as I said, I just leave them at default, but you might get more out of your photos adjusting the sliders.
At this point, you can export the image processed by PureRaw4 as a faux RAW file in the format known as DNG. This is essentially a generic RAW format that can be opened in many photo editors as if it were an actual RAW file straight out of the camera. This means you can take the denoised image from PureRaw4 and start your usual editing process like you would with a standard RAW from your camera.
My usual approach at this point is simply to open the DNG file in my photo-editor (PaintShop Pro 2022 Ultimate) and let it do the RAW conversion. I might do a highlight retrieval or bump up the brightness at this point, to get a better final photo. PaintShop Pro has inbuilt denoising, but it’s relatively ineffective on the whole and I never use it.
My first processing step in PSP is to crop to the more precise composition I am after for the final image. I might also mirror an image of an animal so that it is facing to the right or flying left to right. Seems to be a better view of any creature to my eye unless there’s a good reason not to. DxO has a decent photo editor of its own, which I’ve not tested much. It and PSP and many of the other editors, let you adjust various parameters: Overall brightness, shadows, and highlights, saturation, vibrancy etc. You might also fix white balance if there’s a colour cast. Tools that do a “fill highlight” or boost “clarity” are quite useful too.
Fundamentally, the best approach to any adjustment is to push the sliders or percentages to the level where it looks too obvious that you’ve made a change, and it becomes brash or problematic and then draw them back down a notch or two so that the effect is still there but is much more subtle. The key is to process without making the photo look too painterly. I’d say that if you’re pushing anything beyond about 12%, then it might be time to abandon the photo unless it’s a precious one-off or record shot, and you don’t mind a bit of the painterly effect for the sake of having the shot rather than not.
Now that’s all done I might deal with distractions and use cloning or scratch removal tools to get rid of stray stems of grass and other things. Magic Fill in PSP does wonders for removing distractions and unwanted elements in a photo. It also helps if you’ve done a crop-rotate and ended up with empty triangles at each corner of your photo. Simply select the triangle and apply a Magic Fill and the space will be filled smartly with neighbouring texture, works great with background foliage, water, sky etc.
Once all that’s done, my final step is usually to resize the image for a particular purpose. For sharing on social media, I always resize to a pixel width of 2048, and save as a JPEG with 90% compression. This leads to less compression server side. Then I might apply a moderate “unsharp mask” to make the final image a little bit crisper, but also remembering my 12% rule. I then add my dB/ logo if the image is not destined for a client who requests images without logos or watermarks.
I should add that for denoising I have tried some of the online AI tools and perhaps DxO’s most prominent rival in this area, but they simply cannot compete for removing noise without removing detail. PureRaw4 offers subtle sharpening. If you’re hoping to reduce the effects of motion blur and other such problems in your photos, then you might need to turn to an alternative for that kind of sharpening. That said, I tend to use the DxO denoising and then run it through a (motion) blur-reduction tool.